|
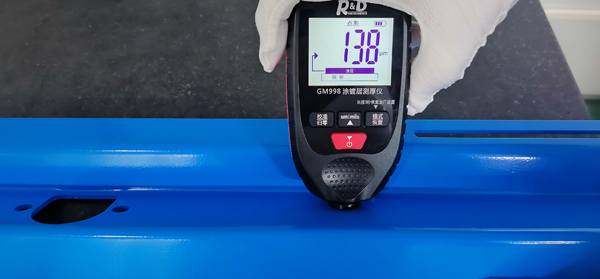
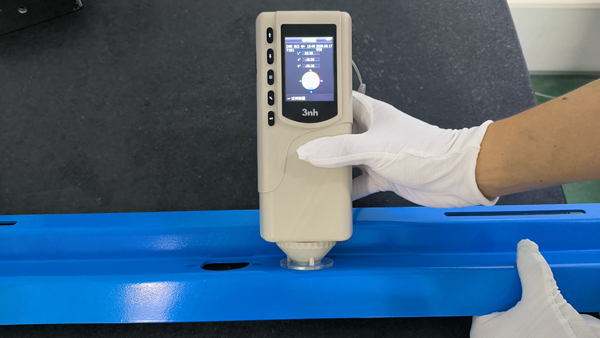
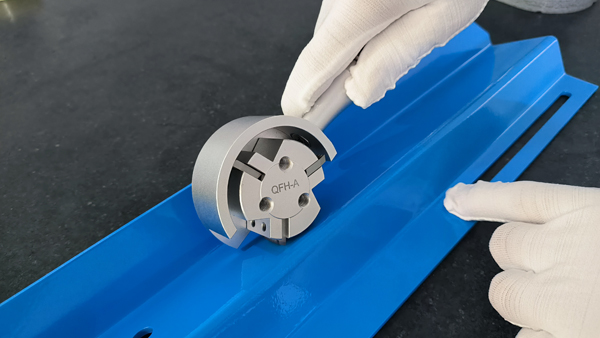
Quality control (QC) for sheet metal enclosures is crucial to ensure they meet design specifications, functionality, and durability requirements. Below is a structured approach to QC for sheet metal enclosures: Tolerances: Check against engineering drawings (e.g., ±0.1mm for precision parts). Flatness & Squareness: Use a surface plate and height gauge to ensure panels are flat and corners are square. 2. Material VerificationMaterial Grade: Confirm material type (e.g., stainless steel 304, aluminum 6061) via material certificates or spectrometer testing. Thickness: Measure sheet thickness with a micrometer to ensure compliance. 3. Surface QualityScratches & Dents: Visually inspect for surface defects. Burns & Burrs: Check edges for excessive burrs from laser cutting or punching. Finish Consistency: Verify powder coating, anodizing, or plating uniformity (color, thickness, adhesion via cross-cut test). 4. Welding & Joining QualityWeld Integrity: Inspect for cracks, porosity, or incomplete penetration (dye penetrant or X-ray testing if critical). Spot Welds: Ensure proper spacing and strength (peel test if required). Fasteners & Rivets: Check tightness and proper installation. 5. Hole & Cutout AccuracyPosition & Size: Use plug gauges or optical comparators to verify hole diameters and positions. Thread Quality: For tapped holes, check thread depth and engagement with a thread gauge. 6. Assembly & FitmentPanel Alignment: Ensure doors, covers, and panels fit without gaps or misalignment. Hardware Functionality: Test hinges, latches, and locks for smooth operation. Gaskets & Seals: Verify proper seating for IP-rated enclosures (dust/water resistance). 7. Corrosion & Coating TestsSalt Spray Test (ASTM B117): For coated enclosures to assess corrosion resistance. Adhesion Test: Tape test (ASTM D3359) to check coating durability. 8. Documentation & TraceabilityBatch/Lot Tracking: Ensure traceability of materials and processes. Inspection Records: Document all QC checks for audits and compliance (ISO 9001). 9. Functional Testing (If Applicable)EMI/RFI Shielding: Test for electromagnetic compatibility (if required). Load Testing: Verify structural integrity under weight/vibration. Common Defects & Corrective Actions
Calipers/Micrometers – For precise measurements. Surface Plate – Flatness verification. CMM – For complex geometries. Go/No-Go Gauges – Quick hole/thread checks. Visual Inspection Tools – Magnifying glass, borescope. By implementing these QC steps, manufacturers can ensure sheet metal enclosures meet industry standards (e.g., ISO 2768, ASME Y14.5) and customer expectations. Would you like a checklist template for inspections? How does height gauge to test the sheet metal parts? A height gauge is a precision measuring tool used to inspect sheet metal parts for flatness, parallelism, hole positions, and step heights. Here’s how it’s applied in sheet metal quality control: 1. Setup & CalibrationSurface Plate: Place the sheet metal part on a granite surface plate (Grade AA for high precision) to ensure a flat reference. Cleanliness: Remove dust or burrs that could affect measurements. Calibration: Zero the height gauge on the surface plate before measuring. 2. Common Measurements on Sheet Metal PartsA. Flatness Check Method: Place the part on the surface plate.Use the height gauge’s scriber or probe to check gaps between the part and plate. Measure variations across the surface (e.g., warping due to bending or welding). Acceptance Criteria: Flatness tolerance (e.g., ±0.1mm per 100mm). B. Height/Thickness MeasurementMethod: Lower the probe onto the part’s surface.Record the height reading (for steps, flanges, or multi-layer assemblies). Tool: Dial indicator attachment for higher accuracy (±0.01mm). C. Hole Position & Pattern AccuracyMethod: Align the part with a reference edge (use a square for perpendicularity).Use the height gauge’s scribe point to mark or verify hole centers. Compare against CAD drawings (e.g., hole spacing ±0.05mm). Alternative: Use a height gauge with a dial test indicator to precisely locate edges/holes. D. Step & Bend Height VerificationMethod: Measure the height of bent flanges or steps relative to the base.Check for consistency across multiple parts (critical for enclosures with lids or panels). 3. Tools & AttachmentsDigital Height Gauge: Provides direct readings (e.g., Mitutoyo 500-196-30). Dial Test Indicator: For micro-level precision (±0.001mm). Scriber Attachment: To mark reference lines or hole centers. Surface Plate: Must be flat within 0.002mm/mm. 4. Step-by-Step Example: Checking Hole AlignmentSecure the Part: Clamp the sheet metal piece to the surface plate. Reference Edge: Align one edge with the surface plate’s datum. |
|


|
How to test screw holes of sheet metal parts? Testing screw holes in sheet metal parts is crucial to ensure proper fit, alignment, and thread integrity for assembly. Here’s a step-by-step guide on how to test them effectively:
1. Visual Inspection Check Hole Alignment: Verify that holes are correctly positioned using calipers or a coordinate measuring machine (CMM) against the engineering drawing. Deburring: Ensure holes are free of burrs or sharp edges that could interfere with screw insertion. Thread Quality (if tapped): Inspect threads for damage, stripping, or incomplete formation. 2. Dimensional Verification Hole Diameter: Measure with a pin gauge, caliper, or micrometer to confirm it matches the required size (clearance hole or threaded hole). Thread Size & Pitch (if tapped): Use a thread gauge or go/no-go gauge to check thread compatibility with the intended screw. Countersink/Depth: Verify depth and angle (for countersunk screws) using depth gauges or optical comparators. 3. Functional Testing Screw Fit Test: Insert the correct screw to ensure smooth threading without binding or cross-threading. Go/No-Go Test: Go Gauge: The screw (or gauge pin) should thread in smoothly. No-Go Gauge: The screw should not over-tighten or fit if the hole is undersized. Torque Test: Apply the specified torque to check if threads hold without stripping (use a torque wrench). Retention Test: If screws must stay in place, test vibration resistance (e.g., shake testing). 4. Advanced Methods (for Critical Applications) CMM (Coordinate Measuring Machine): For high-precision parts, verify hole location, diameter, and thread geometry. Optical Inspection: Use vision systems or microscopes for small or delicate threads. Helix Check: For threaded holes, inspect thread form using a thread plug gauge.
5. Common Defects to Look For Misaligned or off-center holes Undersized/oversized holes Damaged or incomplete threads Excessive burrs or metal shavings Incorrect countersink depth/angle |
 
6. Documentation & ReportingRecord measurements and any deviations from speci- fications. Flag failed parts for rework (e.g., re-tapping, welding/redrilling). Tools You May NeedPin gauges (for hole diameter) Thread gauges (metric/imperial) Torque wrench CMM or calipers Magnifying glass/borescope (for small holes) By following these steps, you can ensure sheet metal screw holes meet quality standards for assembly. Let me know if you need details on a specific test! |

|
Paint adhesion testing is crucial to ensure that coatings on sheet metal remain durable and resistant to peeling chipping, or delamination. Below are common methods used to evaluate paint adhesion on sheet metal: 1. Tape Test (Cross-Cut Test) – ASTM D3359 Purpose: Measures the resistance of paint to separation from the substrate. Procedure: Surface Preparation: Ensure the painted surface is clean and dry. Make Cuts: Use a sharp blade or cross-cut tool to create a grid pattern (typically 6x6 or 11x11 cuts, 1-2mm apart). Apply Tape: Press a piece of pressure-sensitive tape (e.g., 3M #600) firmly over the grid. Remove Tape: Quickly pull the tape off at a 180° angle. Evaluate Adhesion: Compare the amount of paint removed with the ASTM D3359 rating scale (0B to 5B, where 5B = no peeling). Best for: Quick, qualitative assessment of coating adhesion. 2. Pull-Off Adhesion Test – ASTM D4541 Purpose: Quantifies the force required to pull a coating off the substrate. Procedure: Prepare Test Area: Clean the painted surface. Apply Test Dolly: Glue a small metal dolly (10-20mm diameter) to the coating. Use Adhesion Tester: Attach a hydraulic or mechanical pull-off gauge to the dolly. Apply Tension: Gradually increase force until the coating detaches. Record Results: Measure the pull-off strength in psi or MPa. Best for: Quantitative measurement of adhesion strength. 3. Scratch Test – ISO 1518 / ASTM D7027 Purpose: Determines coating resistance to mechanical scratching. Procedure: Use a Scratch Tester: A weighted needle or stylus is drawn across the surface. Increase Load Gradually: Observe the minimum force causing coating failure. Evaluate: Check for scratches that penetrate to the substrate. Best for: Hard coatings or automotive applications. 4. Bend Test – ASTM D522 Purpose: Evaluates coating flexibility and adhesion under deformation. Procedure: Bend the Painted Metal: Use a mandrel or conical bend tester. Check for Cracks/Peeling: Inspect the bent area for coating failure. Best for: Assessing adhesion on formed or stamped metal parts. 5. Humidity / Salt Spray Test – ASTM B117 / D4585 Purpose: Evaluates long-term adhesion under corrosive conditions. Procedure: Expose Painted Metal: Place in a salt spray chamber for a set duration (e.g., 500+ hours). Inspect for Blistering/Peeling: Check adhesion after exposure. Best for: Industrial or marine coatings. Choosing the Right Test Quick Check? → Tape Test (ASTM D3359) Need Exact Strength? → Pull-Off Test (ASTM D4541) Testing Flexibility? → Bend Test (ASTM D522) Corrosion Resistance? → Salt Spray Test (ASTM B117) Proper surface preparation (cleaning, abrasion, priming) is key for good adhesion.
China Sheet Metal Fabrication Companies | Sheet Metal Fabrication Companies in China China Sheet Metal Parts Manufacturers | China Sheet Metal Fabrication Factory China Sheet Metal Fabrication Manufacturers | Sheet Metal Manufacturers in China |
|